

Author Archives: 2010admin
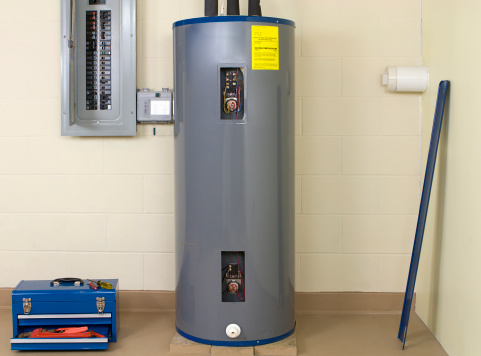
It’s not unreasonable to say that your water heater may be the most valuable appliance in your home. While it’s probably not top of mind or even visible in your day to day, you are using it every day. So when there is an issue, you notice — big time.
And that’s why we’re here to share the most common hot water heater problems that homeowners encounter regularly. That way, you can better diagnose them and fix them before it wreaks havoc on your home.
- No Hot Water
No surprise here; if your water heater isn’t hot, then you have a problem. When your water isn’t heating up, a lack of energy source is likely the cause, so check your electrical connection to ensure it’s on and running properly. If all is working fine, check to see if your breaker has tripped or switched off. For gas heaters, this could be a bad pilot light or a faulty gas connection. If your pilot light is lit but the gas doesn’t ignite, your burner may need repairs.
You can also turn off the breaker and hit the red cut-off button above your thermostat to reset the high-temperature limit on your electric system. If you’re still having issues, contact a professional who can take a look at ignition and flame.
- Low Water Pressure
Unfortunately for older homes, the standard 1⁄2 inch plumbing of the past isn’t doing you any favors in potential water flow issues. Newer homes with 3⁄4 inch plumbing can handle more water, but it doesn’t mean limitations can occur due to clogging.
If you feel like you’re not producing enough hot water, you can try increasing your water pressure by ensuring your aerators in your sink are clear and your water inlet valve hasn’t become partially closed. Otherwise, call Madsen to get to the bottom of it.
- Water is Too Hot
The culprit here is pretty simple: your thermostat is probably too high. The U.S. Department of Energy recommends 120 degrees, but check your water heater’s owners manual for adjusting appropriately.
- Water Leaks
One of the most common water heater issues are leaks. It’s actually inevitable at some point as natural water eventually corrodes your tank and creates super tiny cracks. But that’s not always the cause. Depending on where the leak is coming from (like the top of your tank), you could have a loose water connection or heating element bolts, a stuck valve, or a bad gasket.
Check all heating elements bolts to make sure they’re nice and tight, and make sure your cold water inlet and hot water out pipes are not rattling or loose. If the leak is coming from the bottom of your tank, it could be a condensation issue, which can be solved by turning up the thermostat. If water is leaking from your pressure relief valve, it could mean a corroded tank, which unfortunately means you need to replace your water heater right away.
- Strange Smell
Your water heater shouldn’t stink. If it does, there’s a chance there’s sediment or minerals build up in the pipes. In many cases, this can cause the water to change color or become cloudy as well. When iron pipes rust, the iron’s sediment can get trapped and hinder the flow of hot water, which reduces its temperature and pressure. Calcium and magnesium can do the same if the water is very hard.
Annual flushing of your system can prevent this buildup. And while at-home kits do exist, we recommend calling a professional with the right, heavy equipment for the task.
And if it smells like rotten eggs, then you could have a case of bacteria. Crank up the temperature to about 140 degrees and it should kill it off. If not, try cleaning your tank with chlorine bleach.
If you have any questions about strange smells, low water pressure, or lack of hot water associated with your water heater, the experts at Madsen are here to help. Let us know your concerns, or schedule a routine maintenance check today!
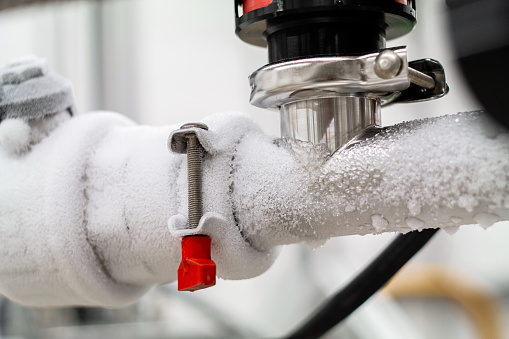
Winter can be a magical time of year. It’s hard not to love the peaceful blanket of white that a fresh snowfall brings or those cozy nights bundled up by the fireside. But it’s also pretty easy for those delightful winter moments to get completely derailed by a sudden pipe burst or leak when Jack Frost starts really showing off.
The truth is, frozen pipes are extremely common in both the cold and the heat. Quick temperature changes, poor insulation, or incorrect use of your thermostat can all contribute to the cause, and unfortunately, the consequences are not nearly as simple — they’re a massive pain.
So in order to prevent your pipes from freezing this season, add the following to-do’s to your pipe maintenance checklist!
- Check for all unheated areas. Check for unheated areas of your home where water lines are exposed. Consider the garage, attic, and under kitchen and bathroom cabinets. These areas can be easily forgotten and will get a lot colder than the rest of your house, so make sure they’re properly insulated or at least your pipes are — which leads us to #2!
- Insulate your pipes. Exposed pipes are more susceptible to freezing, so make sure all pipes that are in attics, crawl spaces, garages, and other unfinished spaces are properly insulated. There are a number of ways to do this, including wrapping pipes in heat tape, insulation strips, or thermostatically-controlled heat cables.
- Drain water. Make sure your swimming pool and water sprinkler supply lines are all empty as instrucred by the manufacturer/installer’s instructions. Close inside valves supplying those outside hose bibs so that water can also drain, and keep them open so that any remaining water can expand without bursting the pipe.
- Seal or caulk cracks. Take a look for any leaks around your electrical, dryer vents, and water pipes. These cracks can let in cold air that make pipes more susceptible to freezing, especially those running inside to outside.
- Let water drip. When it’s really cold outside, let the water drip from the faucet of the cold pipes. By running even just a trickle of water through the pipes, they are less likely to freeze than if there’s sitting water inside them.
- Adjust your thermostat. Setting your thermostat to the same temperature during the day and at night is not only a great way to avoid overworking your furnace, but it also prevents pipes from getting too cold when those temperatures hit their lowest overnight. Similarly, if you’re going away, don’t turn your heat completely off! Keep the heat set to about 55-60° F.
- Open cabinet doors. Try to regularly open cabinets and vanities to allow some warm air in. This will prevent those un-insulated pipes under sinks and appliances from getting too cold.
- Shut off the water. There’s really no reason to have your garden hose hooked up in the dead of winter. Turn off these water sources and drain the system so there’s no remaining water that could freeze. But keep in mind, if you have an internal fire protection sprinkler system, this may also deactivate it as well.
How to Thaw Your Frozen Pipes
If you’re reading this blog a little too late and have unfortunately already discovered some frozen pipes, don’t worry. There are some tricks to thaw them out before they start cracking or leaking.
- First, call a neighbor. If they are experiencing a similar issue in regard to their water flow, it may be the result of a main break. If not, your pipes are probably frozen.
- Go to the main valve and turn off the water asap.
- Open the faucet so that water will flow through the pipe as it melts. This will also aid in the melting process.
- Apply heat around the pipe using a hair dryer, electric heating pad, or portable space heater. But don’t let the water get to a boil — if it’s that hot, you could also damage the pipes.
- Check your pipes for any cracks the freezing may have caused, as well as pools of water that indicate a leak.
- If you can’t locate the frozen pipes or are unable to reach them, call a professional to come out and take a look. They’ll have the right equipment to help you thaw them out.
For help protecting your pipes this winter, or to have a licensed professional make sure you’re ready for winter’s worst, contact our team at Madsen today!
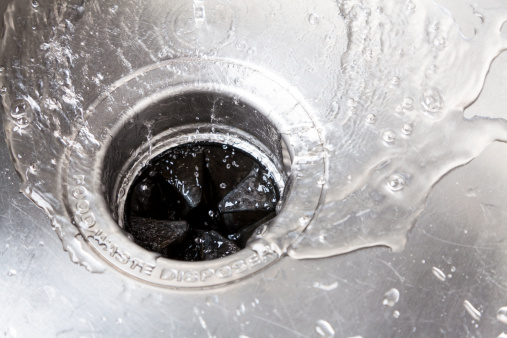
If you ask the average person how often they clean their home, they’ll probably say pretty regularly. If you ask them how much they clean their drains specifically, chances are it’s not nearly as often.
For some reason, homeowners tend to neglect their drains even though we rely on them for cooking, washing, and cleaning every single day. But in order to keep them flowing smoothly, regular cleaning is important! Any water from your drainpipes is sent to the sewer line or your septic tank, so if they’re clogged and dirty, you’ll get stuck with slow or standing water — and a lot of issues you don’t need.
The good news is that Fall is a great time to prioritize your drain cleaning. So when you’re planning out all the other chores on your seasonal home maintenance to-do list, make sure your drains are close to the top!
Why Fall is the Best Time for Drain Cleaning
- There’s more debris during the fall and winter. With the changing colors of autumn comes lots of yard waste. Everything from leaves, twigs, and dirt are determined to find their way into your drains, increasing the risks of clogs and backup. And if you don’t pay attention when the impact is minimal, you can expect much bigger issues with your sewer system — with much larger price tags.
- To avoid issues after Halloween. ‘Tis almost the season for hosting and cooking! Just think about all the pumpkin insides, Thanksgiving spreads, and holiday baking soon to get sent down the garbage disposal and into the dishwasher. If your drains aren’t ready, or you let each holiday’s festivities pile up, you could be in for a very tricky situation this winter.
- To prepare for holiday hosting. Speaking of the holidays, in order to use your sinks, showers, washing machines, and toilets a lot more in the next couple of months, you need them to actually work! If you do experience water backup as guests come to visit, what’s your backup plan? Give yourself the reassurance that every festivity will go smoothly by cleaning your drains now.
- Trees start to change. During the spring and summer, trees will get their moisture above ground because of all the participation in the atmosphere. But as that rainfall sets into the soil, they soak it up through their roots — and that affects your sewer lines. If the line is clogged, those trees will look to your pipes to find nourishment.
- It’s just good sense. The kids are back in their school routines, the house is quiet during the day — why not get your drains tested and cleaned!? And at this time of year, the groundwater level is optimal for cleaning because it’s less likely to get washed into the drain.
Your Drain Cleaning Checklist:
Now that you know why you should clean your drains, here’s how you can go about doing that.
- Snake your drains. If you suspect a blog in your pipes, put the plunger away, and grab a drain snake from your local hardware or home store. These long, flexible wire-like tools are perfect for hard-to-reach areas, snagging all the hair and debris that gets stuck in your shower, tub, and sink drains.
- Check your drain strainers. Each drain has a mesh, metal, or plastic strainer that serves as your first line of defense against food, hair, and debris. So cleaning them out regularly and replacing them when needed are the best way to keep them functioning properly.
- Throw away grease or oil! If you’re currently just dumping the leftover grease and oil from dinner down the drain, that’s a major no-no! While the grease may be a liquid when you dispose of it, it will harden as it cools, causing clogs and damage to your drains.
- Ditch the chemical cleaners. The chemicals in your over-the-counter cleaners are strong and harsh. And while these toxins may be powerful against clogs, they’re also brutal on your pipes. They can cause serious damage to your plumbing system in the long run, and also harmful to skin and eyes as you use them. Leave it to the experts to choose the right cleaners and do the job for you.
- Try home remedies. In between professional cleanings, stick to safer, more natural solutions. A combo of baking soda, vinegar, and hot water can tackle tough grime. Start with the baking soda before adding the vinegar, and let it sit for about 5 min. Then flush it out with boiling hot water once, and again about 30 min later. And try a little lemon juice to remove even the worst odors.
To learn more about the importance of cleaning your drains this fall, or to schedule an appointment with one of our plumbing professionals, contact Madsen today.
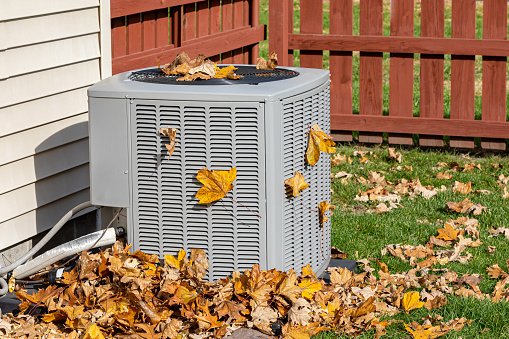
Summer has quickly come to a close, and without even realizing it, the days have gotten cooler. Pumpkin spiced flavors are already filling shelves everywhere, and before we know it, we’ll be turning on the heat! And that means your HVAC system is about to transition into an entirely different mode — after cooling it all summer long. It’s time to pull out your fall HVAC maintenance checklist to ensure your system is ready for the new season, and the harsh winter to follow!
Don’t have one? Madsen has you covered. We’ve put together 9 simple things you need to do to get your system ready for this time of year.
1. Keep Vents Clean and Accessible
As you’re blasting the AC during the summer, dust and debris can build up in your vents. Clearing all this gunk out is essential to keep your air flowing smoothly. Clogs can affect an HVAC system’s coil, blower motor, and other key parts that affect the efficiency and effectiveness of the system overall. Make sure you check this specific item off your list before turning the heat on so you can ensure better indoor air quality for your family this season.
That being said, keep your vents accessible. If they’re being blocked by furniture or carpeting, you’re only blocking air flow, which will force your system to work harder to achieve the temperature you’re asking it to. This will make your system far less efficient, unnecessarily increasing your energy bill each month.
2. Change Your Air Filters
If your air filters are blocked, it can stop your system from working optimally. And clogged air filters can also spread allergens throughout your indoor space. Changing your system’s air filters is recommended on a seasonal basis, so now’s the perfect time to switch yours.
If you’d rather leave it to the professionals, schedule your seasonal HVAC maintenance appointment, and let Madsen change your air filters for you. Don’t wait as this is one of the busiest times of year for service calls!
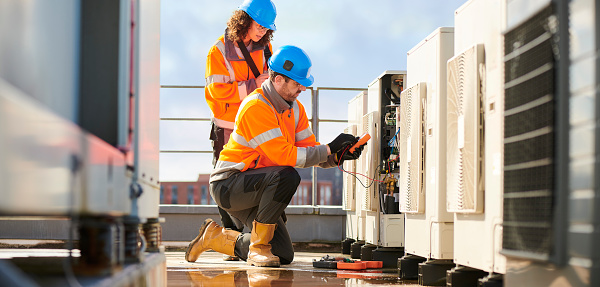
3. Clean Your Outdoor Unit
Before the leaves fall, any debris surrounding your outdoor unit needs to be swept away. If leaves fall on top of the debris that’s accumulated during the summer, you’re in for a long season — and a problematic winter. Give your unit a quick clean to prevent debris from accumulating and compromising the efficacy of your system. Other positive consequences include avoiding a potential fire hazard, stopping the buildup of allergens like pollen and dust, and lowering the risk of needing to get your HVAC system repaired — which can be costly.
4. Consider a Cover
If your system wasn’t looking its best this season, you might want to consider purchasing a cover to better protect your system and ultimately extend its lifespan. It can be especially helpful against inclement winter weather, including ice and snow, which could make it more difficult to access your system when temperatures are below freezing. If you do choose to get a cover, make sure it’s large enough to allow room for moisture to escape, otherwise rust and corrosion can occur.
5. Check Your Thermostat
Don’t forget about your thermostat — your HVAC’s central control panel! Take a minute to make sure it responds correctly and displays an accurate temperature reading. As long as everything’s working, change your settings to accommodate the temperature dips in the evenings and early mornings. That’ll help save energy by preventing your HVAC system from working overtime during these colder hours.
If you do find some problems with your thermostat’s functionality, catching it early is a good thing versus on a very cold day when you rely on it most. Consider upgrading to a smart thermostat if you end up having to replace your current one, as it can aid in efficiency as opposed to more traditional models.
6. Consider a Replacement
If your system has seen better days, it might be time to consider a replacement. Trying to avoid the investment with multiple repairs is likely just putting a bandaid on the situation, which would end up costing you more in the long run. An outdated system isn’t going to heat your home like it should — and the last thing you want to deal with is a system failure in the dead of winter. If you think a replacement is on the horizon, now is the time to call and make an appointment.
7. Seal Air Leaks
If you can take measures to weatherize your home before winter, you can save significantly on your energy bills while sparing your HVAC system a lot of unnecessary effort. Leaky ductwork or loose weather stripping can be responsible for a lot of wasted energy, so take some time to seal key areas of your home to save yourself from a cold and expensive draft this winter.
8. Check On Your Alarms and Detectors
Make sure your smoke and carbon monoxide detectors are functioning properly before putting your HVAC in heat mode. Check the alarms to ensure they sound as they should, and check the batteries to ensure they’re working. Replace any devices that aren’t working at 100%. It’s always better to be safe than sorry!
9. Schedule Your Maintenance Appointment with Madsen
Our team of trusted technicians are happy to do all these steps for you! Our thorough inspection process will be sure to catch any repairs or errors before heat is a necessity this season.
Don’t get stuck with unwanted surprises this season — give us a call for routine maintenance tune-ups that will increase the efficiency, effectiveness, and lifespan of your system. Contact Madsen to schedule your seasonal appointment today.
When it comes to your HVAC, safety should be the number one priority. While we all want and deserve a comfortable home, we don’t all have the training and equipment to make sure our system is doing its job properly. There are dangers lurking in the inner workings that can make attempting a repair on your own not worth the risk.
There are four main problems that can lead to failure: lack of HVAC maintenance, wear and tear, dirty filters, and water damage or leakage. If your system stops working effectively or efficiently, you might be tempted to take a look at it for yourself. Well, don’t! The HVAC industry is relatively dangerous, so let’s go over the most important safety tips you need to know to stay safe around your HVAC system as a homeowner.
1. Place a Carbon Monoxide Detector Near Your Furnace
When operating a heating system that hasn’t been well-maintained, it’s possible for carbon monoxide to make its way into the air around it. In order to avoid getting poisoned, a carbon monoxide detector can be a crucial element to have around your main system to let you know of high levels caused by leaks. Carbon monoxide is odorless and colorless, so without a detector close by, it can be almost impossible to catch before it becomes a serious problem.
Needless to say, you shouldn’t be messing around with your furnace yourself! Avoid any risk of carbon monoxide poisoning by leaving the work to our professionals. The HVAC experts at Madsen are highly-trained technicians who have your needs for heating repairs covered.
2. Turn Off the Power Before Cleaning an AC Unit
While electrical issues and cooling repairs should always be handled by an experienced technician, you may want to clean your AC unit from debris once in a while between routine maintenance visits. That’s perfectly safe to do, as long as you turn off the power beforehand. If your AC has electricity running through it while you’re cleaning the outdoor unit or dusting off evaporator coils, you could put yourself in a potentially very dangerous situation. Hit the power switch before cleaning your AC unit, and getting the cooler air flowing should be a breeze.
3. Practice Simple Ladder Safety Rules
Even if you’re just going to change your filter, basic HVAC home maintenance tasks can become perilous if conducted incorrectly — especially if you have to use a ladder to access your unit or ducts. According to a CDC report, thousands of people in the U.S. are injured due to ladder-related falls every year. By paying attention to ladder safety rules, you can make your filter change far safer in a matter of minutes.
When setting up, keep the base of the ladder a quarter of its working length from the building you’re working on and use the three-point contact rule with both hands and one foot or two feet and one hand at all times. When it comes to extension or straight ladders, extend them at least three feet above the support point and make sure all locks are engaged before use. Whether you’re cleaning your HVAC or changing a light bulb, these simple tips are helpful for making any household ladder use a lot safer.
4. Avoid Potential Hazards by Refraining from DIY Repairs
When it comes down to it, leaving repairs to the professionals is the most important safety tip we can share. If you don’t know what you’re doing, there are several ways to get hurt or make things worse. For example, if you don’t know how to test the circuit with a meter before working on your system, electrical hazards can be extremely common. Chemical exposure could also occur if you don’t have the right training or equipment to handle the job carefully and protect yourself. Using the wrong tools or working in a space with inadequate airflow can have serious implications to your health.
When it comes down to it, extensive training and high-end equipment are necessary when it comes to repairing your system properly and making sure you and your family stay safe.
Staying safe when it comes to HVAC maintenance means leaving repairs to the capable hands of technicians that work with your best interests in mind. And you can rely on the experienced professionals and state-of-the-art equipment here at Madsen. Contact our team to get your HVAC system back up and running while keeping your and your loved ones safe.